Tuesday, March 13, 2012

Butterless Wheat Flour Strawberry Cupcakes


As usual cupcake crave bit my son, he started pleading for them and as usual his dialogue was 'If you don't make me cupcakes I'll not be your best friend' ha ha. Since it was late evening I was almost sure its gonna be his dinner, so I wanted to make a healthy one without compromising on the taste. I didn't have any banana or dates which I love to add in muffins and teatime cakes. Only fruit I had was strawberries, so just chopped some and added it as well. While I was mixing the batter my son was looking all around the pantry cabinets and he told me 'Amma add some raisins too, it will taste yumm'. So I just add a handful of raisins as well, the result was awesome, healthy, yummy and guilt free cupcakes. This recipe is very simple and ezee, straight forward, any newbie can bake them. So try this out friends, Enjoy!!!!


Ingredients:-
  1. Wheat flour - 1 ½ cup
  2. Baking powder - 1 ½ tsp 
  3. Salt a pinch
  4. Eggs - 3 
  5. Canola oil/Veg oil - 2 tbsp
  6. Brown Sugar - 3/4 cup(you can add upto 1 cup according to the sweetness you need, can use normal sugar as well)
  7. Strawberries chopped ~ 6 (you can add blueberries or any fruit of your choice) 
  8. Raisins a handful (optional)
  9. Luke Warm Water ~ 1 cup

Preparation Method:-
  • Pre-heat the oven to 350 degree Fahrenheit.
  • Sieve together Whole wheat flour, baking powder and salt and set aside(or whisk all three ingredients together very well to combine)
  • In another bowl beat the eggs well with a wire whisk till it turn lemon yellow color. Add oil and beat well again to mix. Add Sugar and beat again for two-three minutes to combine. 
  • Add the sieved/sifted dry ingredients and mix with the wire whisk(The batter will be too thick at this point). Add in the chopped strawberries and raisins as well, stir to mix.
  • Add warm water little by little to loosen the batter and whisk gently till you get a medium thick batter(you can add low fat warm milk instead of water as well) .
  • Line up the cupcake tray with liners, scoop out the batter and pour in each liners just till half of the cup liners.
  • Bake around 30-35 minutes or till a Sharp Knife/Cake Tester inserted comes out clean. 

Saturday, March 10, 2012

Oothappam - The Indian Pizza???

What do you do with the over-fermented dosa/Idli batter??? I make these cute little Chellamani Snack for kids or if I don't have anything pre-planned for breakfast I go for this delicious and gorgeous Vegetable Oothappam. As every South Indian home even I do make Idli batter almost every week, refrigerate them in a container once fermented to be handy any day of the week or any time of the day . First day I makes dozens of Idlys, next day comes the dosas and then comes this yummy Oothappams. Oothappams are thick dosa like pancakes made with the veggies.


I make them in two different ways:- One by making thick dosas/pancakes, sprinkling the mixed veggies, cook, flip, cook again and take them out. Two adding all the veggies in the Idli batter and mixing them well and make thick Oothappams. Both tastes great, I like the first way - Crunchy veggie bites spread over the Oothappams where as my hubby like the second way - bites of veggies inside the Oothappams.


Ingredients:-
  1. Idli/Dosa batter ~ 4 cups(Find dosa batter recipe here if you are a newbie :-))
  2. Grated Carrot - 1
  3. Chopped Onion - 1
  4. Chopped Tomato -1 
  5. Green Chilies chopped - 3
  6. Coriander Leaves/Cilantro chopped ~ 3 tbsp
  7. Salt ~ 1 tsp(to taste)

Preparation Method :- 
  • Put all the veggies and cilantro in a bowl, add salt and mix well with clean hands. Reserve.
  • Heat up a non-stick Griddle/Tawa, when the griddle is hot enough pour a big ladle of batter and spread very gently(Don't spread too much, Oothappams are thick compared to dosas and small in size)
  • Immediately spread a tsp of mixed veggies on top of dosa before the spread gets dried off(you can drizzle a tsp of oil/ghee on the edges of oothappam and gently press the veggie top with a spatula if desired - I didn't use any oil/ghee) 
  • Wait for a minute, once the bottom side is cooked and you see sponge like holes on top, then  flip the oothappam, press gently with a spatula if desired and wait for a minute till the other is cooked well. 
  • Take off the tawa. Before spreading the next dosa wipe the tawa/griddle with a clean towel/thick paper napkins to clean off any veggie residue remaining when you cook the Oothappam. 
  • Repeat the process for the rest of the batter and veggies. Serve warm with Tomato Chutney or Sambhar or Coconut Cutney 
  • Now for the variation Ootappam without the veggie spread on top, mix all the ingredients together, heat up the tawa, pour a ladle of batter, spread gently to make thick Oothappams, flip over when the bottom is cooked and take out of the griddle when the other side is cooked as well.

Sending this to Pari's Only South Indian Event, The Kerala Kitchen Event here @ Cook-Ezee, and Srav's Vegan diet - Only plant based


Notes:-

1. If you want to make oil free dosas/Oothappams your tawa/griddle should be non-stick and there should not be any tear offs on the griddle due to over heating.
2. If you have issues with griddle, wash and clean them and spread some ghee/butter/oil and keep it overnight. Fully wipe off the oil with a paper napkin or towel just before you make dosas.
3. Don't over heat the griddle/tawa, always keep them in between medium-high temperature(ie not to full flame, but a bit less than high heat)

Wednesday, March 7, 2012

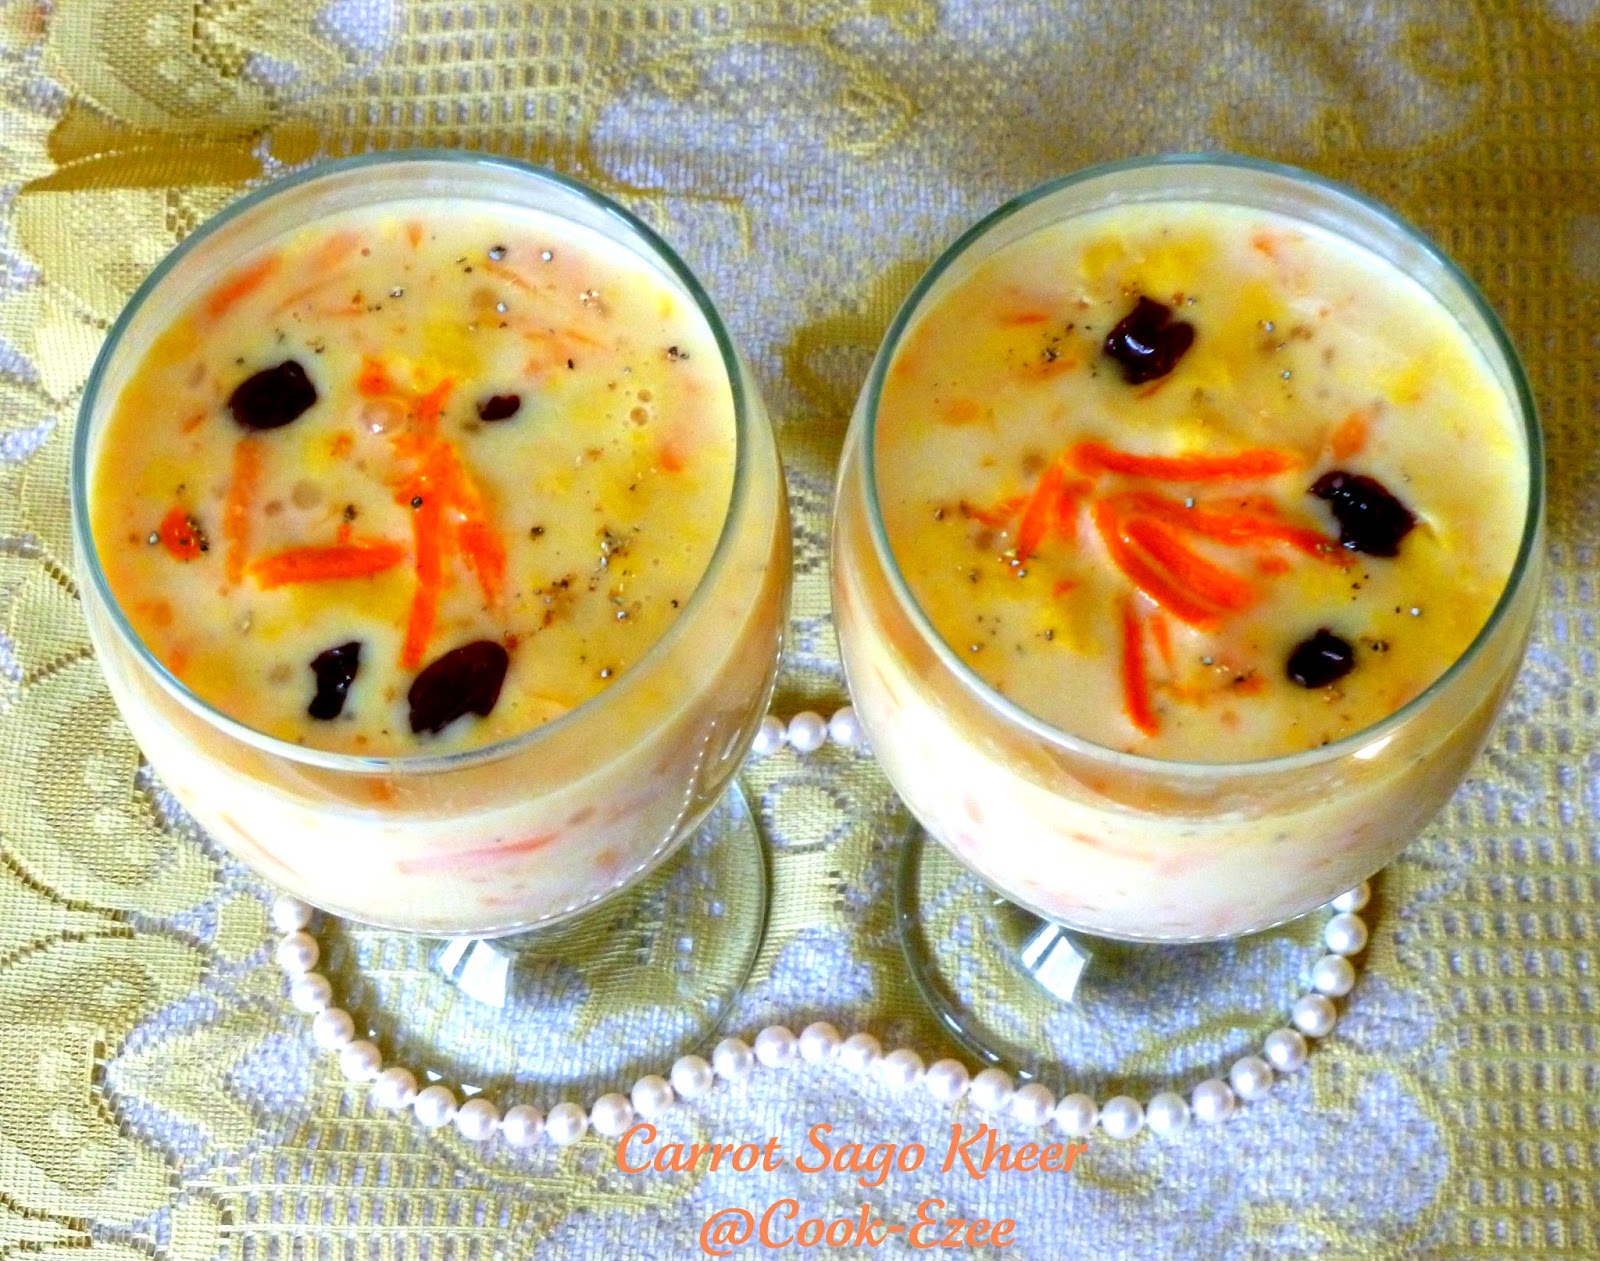
Carrot and Sago(sabudhana) Kheer/Carrot Sago Pudding

Its been long, yes to stay out of the blog for about two weeks is really too long I know. I didn't have any other option, the viral fever was terribly bad. Is it because of the drastic change in weather, early spring or should I say kind of early summer??? It took its own sweet time for my family to recover, started with my son taken over by my little one and then the hubby. The worst was my daughter's and my hubby condition, it took too long for my hubby to recover, he never had this bad viral, thankfully he is getting better and we're getting back to the normal routine :-) 


Before moving on to the recipe let me share with you all about what I won from my wonderful fellow blogger friends event and giveaways. One fine morning I woke up and found that I won Monica Bhide's cookbook 'Modern Spice' from Pari's Foodelicious on her 300th Post Giveaways. I was so thrilled and happy when I got to know about it. She has such a beautiful blog with more than 300 recipes and I admire her for the  consistency in blogging with each recipes better than the other. Thanks a lot Pari for choosing me as the winner, this is the first cookbook I ever won, rather the only cookbook I have(I never bought a cookbook till now)). And so sorry about posting about it so late, hope better late than never :-)

Awesome, right???
Its signed by Monica Bhide :-)  
Isn't it awesome to win two giveaways in a row in the same month, yes there is yet another giveaway win from Akheela's TorviewToronto on her Tea Time Event. I won this cute looking Libre Glass n Poly Tea by participating and linking in my Chicken Spring Rolls. Thanks a lot for choosing me as the winner and Thanks a ton for all the follow ups and extra effort you did till the Libre tea was shipped and it reached us :-)

Isn't that cute????

We go through different recipes daily from many sources and especially blog authors get to know lot of delicious and innovative recipes from their fellow bloggers as well other than from the cookery shows, cook books etc. Many time I decide to try out some of those wonderful recipes from my fellow bloggers when they post it but then I totally forget them as I always try to cook with the ingredients available in my pantry and I don't bother much to think what to make for the day. But this recipe of Radhika at Tickling Palates was in my mind from the time she posted it maybe because it was so unique or Is it because that was her guest post for Kavi's Cooking with Kin Series Event which gained my attention since I was also a part of the event with my Soy Granules Kheer.


Also I make kheer/payasam often since my son's request for them comes more often than any other desserts. This is the first recipe I tried from my fellow blogger friend, Thanks a lot Radhika for sharing this beautiful recipe with your friends and readers. It tasted just perfect and delicious, my family loved it - especially my son .Check out for the original recipe here as I have made slight variations that suits our taste buds.


Ingredients Used :-

  1. Grated Carrot ~ 1 cup(I used 3 big carrots)
  2. Sago/Sabudhana/Tapioca Pearls - 1/2 cup
  3. Brown Sugar ~ 3/4 cup(you can add little more, I didn't make it very sweet)
  4. Cashews, Raisins a handful
  5. Milk ~ 3 cups
  6. Cardamom - 3 pods
  7. Ghee - 2 tsp
  8. Water as needed
Preparation Method :- 
  • Wash and soak the Sago/Sabudhana in water for 30-45 minutes. 
  • Heat up a thick bottom vessel, pour the ghee. Add cashews and saute to golden brown, remove and keep aside. Reduce the heat to medium, add raisins and saute till they plump up, remove and set aside.
  • Add the grated carrot to the same vessel saute for about three-five minutes till carrot absorbs the aroma of ghee.(I took out a spoon of carrot to garnish)
  • Drain off the water from sago/sabudhana and add to the carrot and saute for a minute or two.
  • Pour 1/2 cup of water and two cups of milk, stir well and let it boil. Simmer the heat to medium and let it cook till sago turns transparent.
  • Pour rest of the milk, stir well and let it boil again and then cook till the kheer start to thicken for about five-seven minutes(Kheer thickens fast because of the sago). 
  • Add the cardamom powder, stir well to mix. Switch off the stove.
  • Garnish with ghee fried cashews, raisins, strips of grated carrot and serve warm or chilled. Enjoy!!!

Sunday, March 4, 2012

Kerala Unakka Meen Curry - Dry fish curry with Raw Mango


Ingredients Used:-
  1. Dry Fish/Unaka Meen ~ 200 gms(I used Shark)
  2. Turmeric powder - 3/4 tsp
  3. Chilly powder - 1 1/2 tsp
  4. Salt to taste(if required only as the dry fish already have salt in it)
  5. Shallots/Kunjully finely sliced ~ 1 cup(can use finely sliced onions instead)
  6. Green Chilies - 4
  7. Finely chopped ginger ~ 1 1/2 tsp
  8. Tomato finely sliced - 1
  9. Pacha Manga/Raw Mango - 1/2 from the raw mango(according to the sourness of the mango add/reduce mango pieces)
  10. Curry leaves a sprig or more
  11. Water a cup or more as needed 
To Grind:-
  1. Grated Coconut - 1 1/2 cups
  2. Jeera/Cumin - 1 tsp
  3. Turmeric powder - 3/4 tsp
  4. Dry Red chilies - 3
  5. Water just enough to grind 

Preparation Method:- 
  • Soak the dry fish in warm water for 30 minutes to wash off excess salt.
  • Marinate with turmeric powder and chilly powder and set aside for 30 minutes or more if possible
  • Grind the to grind ingredients and set aside.
  • Add the marinated dry fish to the Manchatti/Earthen ware or any pan/vessel. Add the sliced shallots, tomatoes, ginger, green chilies, few curry leaves and chopped mango pieces. 
  • Add enough water to cover the dry fish and veggies. Cover and cook till tomatoes and mango pieces are just soft.
  • Add the ground coconut paste and stir gently to mix well. Add/adjust water according to the consistency you need for your gravy.
  • Let it cook again, when the gravy starts to boil simmer the heat to medium and cook it for few more minutes say five-seven minutes till the raw flavor of coconut mix is fully gone. 
  • Put more curry leaves and switch off the stove. Serve with boiled rice.

Notes:-
  1. Normally back in Kerala most house holds do this trick to remove excess salt from dry fish. Normally they soak news paper pieces along with dry fish and water as they absorb the salt. But my Achan(dad) never let us do this as he says carbon is injurious to health. I'm not sure about it, use ur logic and understanding before doing it :-)
  2. You can used Tamarind extract or Gambooge Kudam Puli if you don't have raw mango .

Friday, March 2, 2012

Soybean Granules Kheer - Guest Post for Kavi's Edible Entertainment


I wonder how many teens and youngsters these days have the passion and love to cook and I absolutely admire this sweet girl for her eagerness for the same that end up creating such a wonderful blog Edible Entertainment. Her perseverance to succeed in her Studies and Career along with equal passion for her hobby is really appreciable. Yes friends, you guessed her right. She is none other than Kavitha, rather known as Kavi - One of our best blogger buddy and one of the youngest Chef in bloggers world.

Couple of weeks back when she wrote about preparing for her C.A exams, taking a break from cooking and blogging, many among us like me wished best wishes for her exams. To my surprise she was not just doing her scheduled draft posts but also was back with a bang of another Event 'Kids Delight' and then the Series Event 'Cooking with Kin'. Now friends, this is the kind of passion and love towards blogging which I was talking about. When she asked me to do a guest post for her series event I was really happy since this is my very first guest post. So let me present this energy booster and sweet kheer for this sweet girl to boost her up for her studies and I wish her All The Very Best for the exams and wishing her best of all in everything she do.


Now coming to this recipe, I'm sure who ever visit this space often is aware of my love for Soybean. I've posted a lot of Soybean recipes and I have more recipes of the same in draft. I found this Kheer recipe in the Recipe Booklet that comes along with Nutrela Soybean box. I saved the booklet in my kitchen cabinet for future reference of this Kheer and more soybean recipes. But my son who loves doing his craft on shapes and more did his experiment on my Recipe Booklet and I found it in fine stripes one day :( I wonder how did he reach out to those scissors that was kept far off his reach, yes I'm sure he is growing up fast. My heart sank for a while but then I started making this Kheer since I just knew even Soybean Kheer can be made. This is the quickest Kheer you can ever make and it really tastes great. This is a great healthy option for even diabetic, cholesterol patients (Use Splenda or any sugar substitute instead of sugar for diabetic diet) with high protein, no ghee, rice or any carbohydrate/fatty ingredients. Try this out friends, I'm sure you guys will love it.

Ingredients:-
  1. Soybean Granules - 3/4 cup
  2. Sugar - 1 cup(more or less according to your taste)
  3. Milk - 2 cups
  4. Evaporated Milk - 1 tin(I used Nestle Carnation Milk)
  5. Slivered Almonds - 2 tbsp(optional, can use any nuts of your choice)
  6. Water ~ 2 cups(enough to soak soy granules)
  7. Cardamom powder - 1 tsp

Preparation Method:-
  • Boil enough water, soak the granules in boiled water for two-three minutes and drain them in a Colander/Muslin Cloth.
  • Wash them in more water two-three times so that granules leave its smell. Squeeze out all the water from granules and set aside.
  • Pour milk in a vessel and bring them to boil. Add Soybean granules to the milk, stir well and let it cook for few minutes(around two-three minutes) in medium heat. 

  • Add sugar and stir well and cook it for another few minutes(Say five-seven minutes) till granules absorbs the sweetness and the milk start to thicken a bit.
  • Pour the evaporated milk, stir well and cook again in low-medium heat for five minutes. Add the cardamom powder, stir and cook again for few(two-three mins) more minutes.
                  
  • Take off the stove and move to individual serving bowls. Garnish with silvered almonds and serve warm or chilled(I prefer them chilled). Enjoy!!!!!!

Notes:-
  1. You can use condensed milk instead of carnation milk, but just make sure to reduce the sugar accordingly.
  2. If you do not have condensed milk or carnation milk in your pantry no worries. Add two more cups of milk and simmer the stove to low-med and cook for another ten minutes or till the milk thicken and start to get the creamy color.
  3. As I mentioned before this is a great healthy dessert/kheer option for elderly people if you can use any sugar substitute(like splenda) since the kheer do not have any fat, carbohydrate, cholesterol content.
  4. This tastes great when chilled(I prefer it chilled, can serve warm as well).
  5. You can sauté the drained granules in 1 tsp of ghee to get a better flavour(purely optional)
Related Posts Plugin for WordPress, Blogger...